Getting Started with INDI
This guide provides a comprehensive introduction to INDI (Instrument-Neutral Distributed Interface), a protocol and framework for controlling astronomical equipment. It covers the basics of INDI, how to install and set up the INDI system, and how to get started with using INDI to control your astronomical devices.
What is INDI?
INDI (Instrument-Neutral Distributed Interface) is an open-source protocol and framework designed for controlling astronomical equipment. It provides a standardized way for astronomical software to communicate with telescopes, cameras, focusers, filter wheels, and other astronomical devices.
Key features of INDI include:
- Device Independence: INDI allows software to control devices without needing to know the specific details of each device.
- Network Transparency: INDI uses a client-server architecture, allowing devices to be controlled over a network.
- Cross-Platform: INDI is available on Linux, macOS, and Windows (via WSL).
- Extensible: INDI can be extended to support new devices and functionality.
- Open Source: INDI is released under the GNU General Public License, allowing for community development and improvement.
INDI Architecture
The INDI system consists of three main components:
- INDI Server: A standalone process that manages the communication between INDI drivers and clients.
- INDI Drivers: Processes that communicate with hardware devices and expose their functionality through INDI properties.
- INDI Clients: Applications that connect to the INDI server, discover devices, and control device properties.
Architecture Overview
The following diagram illustrates the typical INDI Client / Server / Driver / Device connectivity:
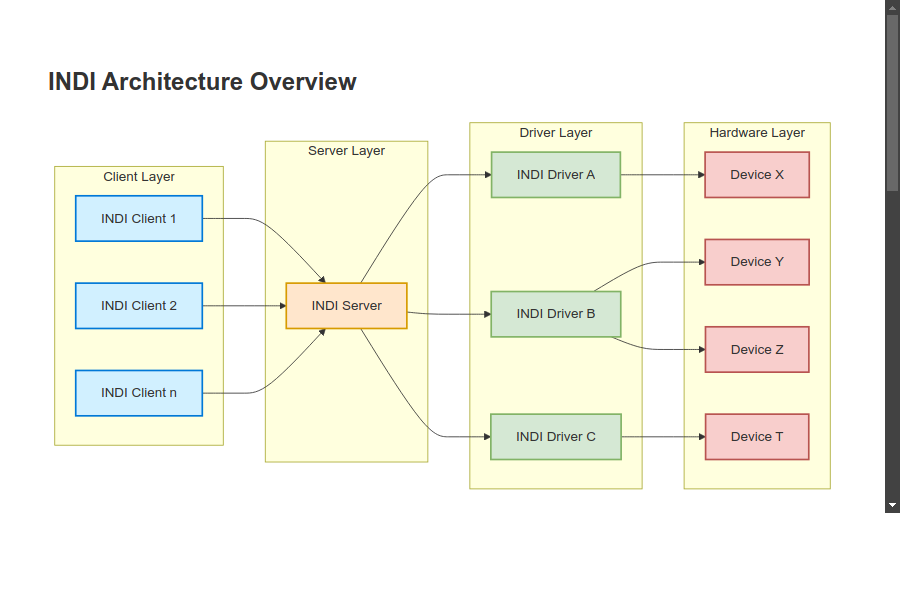
INDI server is the public network access point where one or more INDI Clients may contact one or more INDI Drivers. The indiserver launches each driver process and arranges for it to receive the INDI protocol from clients on its stdin and expects to find commands destined for clients on the driver’s stdout. Anything arriving from a driver process’ stderr is copied to indiserver’s stderr. INDI server only provides convenient port, fork and data steering services. If desired, a client may run and connect to INDI Drivers directly.
Communication Flow
The following diagram illustrates the communication flow between INDI components:
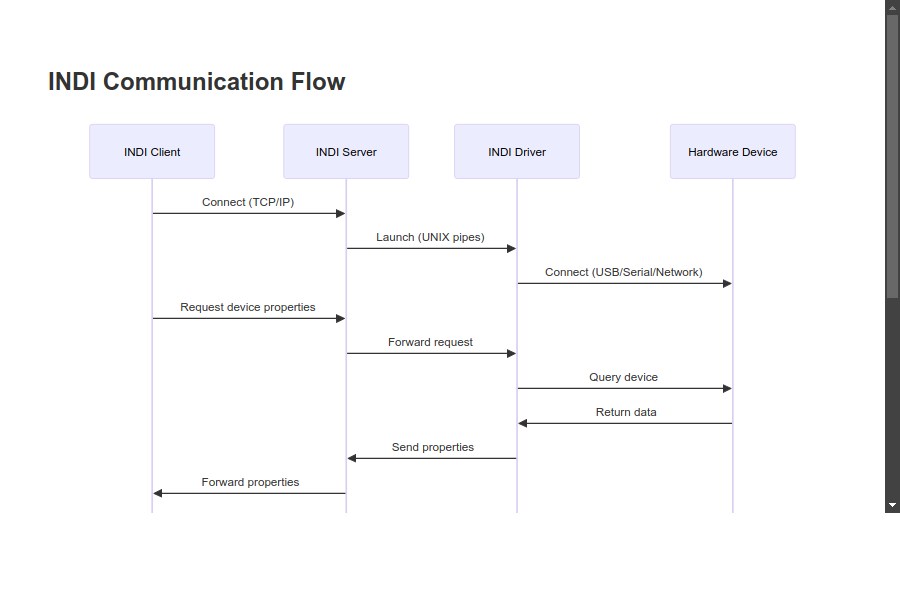
The communication flow is as follows:
- Clients connect to the INDI server using TCP/IP sockets.
- The server launches and connects to drivers using UNIX pipes.
- Drivers connect to hardware devices using USB, serial, or network connections.
- Clients request device properties from the server.
- The server forwards requests to the appropriate drivers.
- Drivers query the hardware devices and return data.
- The server forwards the device properties back to the clients.
- Clients can set property values, which are forwarded through the server to the drivers and then to the devices.
- Devices acknowledge commands, and the updated property states are sent back to the clients.
Installation
Linux
On most Linux distributions, INDI can be installed from the package repositories:
Ubuntu/Debian
sudo apt-get update
sudo apt-get install indi-bin indi-full
This will install the INDI server, core drivers, and additional drivers.
If you need specific drivers or want to install a minimal set of packages, you can install just what you need:
sudo apt-get install -y \
  indi-bin \
  libindi-dev \
  libindi1
Fedora
sudo dnf install indi indi-libs
Arch Linux
sudo pacman -S indi
macOS
On macOS, INDI can be installed using Homebrew:
brew tap indilib/indi
brew install indi-bin
Windows
INDI is not natively supported on Windows, but it can be used through the Windows Subsystem for Linux (WSL):
- Install WSL following the official instructions.
- Install a Linux distribution (e.g., Ubuntu) from the Microsoft Store.
- Open the Linux distribution and install INDI as described in the Linux section.
Building from Source
If you need the latest version or if INDI is not available in your package repositories, you can build it from source:
Install Pre-requisites
On Debian/Ubuntu:
sudo apt-get install -y \
  git \
  cdbs \
  dkms \
  cmake \
  fxload \
  libev-dev \
  libgps-dev \
  libgsl-dev \
  libraw-dev \
  libusb-dev \
  zlib1g-dev \
  libftdi-dev \
  libjpeg-dev \
  libkrb5-dev \
  libnova-dev \
  libtiff-dev \
  libfftw3-dev \
  librtlsdr-dev \
  libcfitsio-dev \
  libgphoto2-dev \
  build-essential \
  libusb-1.0-0-dev \
  libdc1394-dev \
  libboost-regex-dev \
  libcurl4-gnutls-dev \
  libtheora-dev
XISF Support (Optional)
To enable XISF format support in INDI, you need to build or install libxisf package:
sudo apt-add-repository ppa:mutlaqja/ppa
sudo apt-get -y install libxisf-dev
Get the code
To build INDI in order to run drivers, then it is recommended to perform a quick shallow clone that will save lots of bandwidth and space:
mkdir -p ~/Projects
cd ~/Projects
git clone --depth 1 https://github.com/indilib/indi.git
On the other hand, if you plan to submit a PR or engage in INDI driver development, then getting a full clone is recommended:
mkdir -p ~/Projects
cd ~/Projects
git clone https://github.com/indilib/indi.git
Build indi-core (cmake)
mkdir -p ~/Projects/build/indi-core
cd ~/Projects/build/indi-core
cmake -DCMAKE_INSTALL_PREFIX=/usr -DCMAKE_BUILD_TYPE=Debug ~/Projects/indi
make -j4
sudo make install
Build indi-core (script)
Alternatively, you can use the developer-build.bash script for faster build and less stress on your SSD or HDD:
cd ~/Projects/indi
./developer-build.bash
By default, this script builds the indi-core inside machine’s RAM, i.e. /dev/shm.
However, you can change the target build directory using the -o option, for instance:
./developer-build.bash -o /path/to/new/build/dir
Also, this script checks if the target build directory has at least 512MB of memory available and aborts if this is not the case.
You can force skip this test with the -f option:
./developer-build.bash -f
Furthermore, this script executes make in parallel by default.
If you are having problems or need to use fewer CPU cores, please adjust using the -j option.
For example, to disable parallel execution:
./developer-build.bash -j1
IDE Integration
Qt Creator
If you are planning to develop using Qt Creator:
- First follow the process above and do a manual build
- In Qt Creator, open the project using File - Open File or Project
- Navigate to Projects/indi and select the CMakeLists.txt file
- Qt Creator will open your project but will probably configure it incorrectly
- Select the Projects tab and change to the Projects/build/indi-core directory that you used to do the initial build
- The project display may be blank but click on the build button (the geological hammer) anyway
- The project should build
VS Code
INDI includes a default .vscode directory with default settings for building and launching the project:
- After opening the project for the first time in VS Code, install all the recommended extensions
- Install the following packages:
sudo apt-get -y install astyle clangd - Enable clangd extension in settings
- The default launch script debugs INDI simulator telescope driver
Setting Up INDI
Starting the INDI Server
To start the INDI server with one or more drivers, use the following command:
indiserver [options] driver1 [driver2 ...]
For example, to start the INDI server with the CCD Simulator and Telescope Simulator drivers:
indiserver indi_simulator_ccd indi_simulator_telescope
INDI Web Manager
The INDI Web Manager is a web-based interface for managing INDI servers. It provides a user-friendly way to start, stop, and configure INDI drivers, and to monitor the status of the INDI server.
To install the INDI Web Manager:
sudo apt-get install indi-web
To start the INDI Web Manager:
indi-web
By default, the INDI Web Manager listens on port 8624. You can access it by opening a web browser and navigating to:
http://localhost:8624
INDI Development VirtualBox Machine
For detailed information on the INDI Development VirtualBox Machine, including configuration, download instructions, and a tutorial, please refer to the INDI Development VM page.
INDI Clients
INDI clients are applications that connect to the INDI server, discover devices, and control device properties. There are several INDI clients available:
KStars/Ekos
KStars is a desktop planetarium application that includes Ekos, a powerful astrophotography tool that uses INDI to control astronomical equipment.
To install KStars/Ekos:
sudo apt-get install kstars-bleeding
To start KStars:
kstars
To access Ekos, click on the “Ekos” button in the KStars toolbar.
INDI Control Panel
The INDI Control Panel is a simple client that allows you to control INDI devices.
To install the INDI Control Panel:
sudo apt-get install indi-bin
To start the INDI Control Panel:
indi_control_panel
INDI Web Client
The INDI Web Client is a web-based client that allows you to control INDI devices from a web browser.
To install the INDI Web Client:
sudo apt-get install indi-web
The INDI Web Client is included with the INDI Web Manager and can be accessed at:
http://localhost:8624/client
Custom Clients
You can also create your own INDI clients using the INDI client API. The API is available in several programming languages, including C++, Python, and JavaScript.
For more information, see the INDI Client Development guide.
Basic Usage
Connecting to Devices
To connect to a device using an INDI client:
- Start the INDI server with the appropriate driver.
- Start the INDI client and connect to the INDI server.
- Select the device from the list of available devices.
- Click the “Connect” button to connect to the device.
Controlling Devices
Once connected to a device, you can control it by setting property values:
- Navigate to the property you want to control.
- Set the property value.
- Click the “Set” button to send the new value to the device.
Monitoring Devices
You can monitor device status by observing property values:
- Navigate to the property you want to monitor.
- Observe the property value and state.
Example: Capturing an Image with a CCD Camera
Here’s an example of how to capture an image with a CCD camera using the INDI Control Panel:
- Start the INDI server with the CCD driver:
indiserver indi_simulator_ccd
- Start the INDI Control Panel:
indi_control_panel
-
Connect to the CCD device:
- Select the CCD device from the list of available devices.
- Click the “Connect” button.
-
Set the exposure parameters:
- Navigate to the “CCD_EXPOSURE” property.
- Set the exposure duration (in seconds).
- Click the “Set” button.
-
Monitor the exposure progress:
- Observe the “CCD_EXPOSURE” property value, which shows the remaining exposure time.
- When the exposure is complete, the property value will be 0.
-
View the captured image:
- The image will be displayed in the INDI Control Panel.
- You can save the image to a file by clicking the “Save” button.
Example: Controlling a Telescope
Here’s an example of how to control a telescope using the INDI Control Panel:
- Start the INDI server with the telescope driver:
indiserver indi_simulator_telescope
- Start the INDI Control Panel:
indi_control_panel
-
Connect to the telescope:
- Select the telescope device from the list of available devices.
- Click the “Connect” button.
-
Set the target coordinates:
- Navigate to the “EQUATORIAL_EOD_COORD” property.
- Set the right ascension (RA) and declination (DEC) values.
- Click the “Set” button.
-
Start the slew:
- Navigate to the “ON_COORD_SET” property.
- Select the “TRACK” option.
- Click the “Set” button.
-
Monitor the slew progress:
- Observe the “EQUATORIAL_EOD_COORD” property state, which will be “Busy” during the slew.
- When the slew is complete, the property state will change to “OK”.
Advanced Topics
Remote Control
INDI allows you to control devices remotely over a network. To connect to a remote INDI server:
- Start the INDI server on the remote machine:
indiserver -v indi_simulator_ccd
- Connect to the remote INDI server from the client:
- Specify the remote server hostname or IP address.
- Specify the remote server port (default: 7624).
Automation
INDI can be used to automate astronomical observations. You can create scripts or programs that connect to the INDI server, control devices, and process data.
For example, you can use the INDI client API to create a script that:
- Connects to the INDI server.
- Connects to a telescope and a camera.
- Points the telescope at a target.
- Captures an image with the camera.
- Processes the image.
- Repeats for multiple targets.
Integration with Other Software
INDI can be integrated with other astronomical software, such as:
- Planetarium Software: KStars, Stellarium, Cartes du Ciel
- Image Processing Software: FITS Liberator, PixInsight, GIMP
- Plate Solving Software: Astrometry.net, PlateSolve2
- Guiding Software: PHD2, Lin_guider
- Focusing Software: Focus Max, Focus Boss
Troubleshooting
Common Issues
INDI Server Won’t Start
If the INDI server won’t start, check the following:
- Port Conflict: Make sure no other process is using the same port.
- Driver Path: Make sure the driver executables are in the system PATH or specify the full path.
- Permissions: Make sure you have permission to run the INDI server and drivers.
Clients Can’t Connect
If clients can’t connect to the INDI server, check the following:
- Server Running: Make sure the INDI server is running.
- Firewall: Make sure the firewall allows connections to the INDI server port.
- Network Configuration: Make sure the client can reach the server on the network.
Drivers Won’t Connect to Devices
If drivers won’t connect to devices, check the following:
- Device Connected: Make sure the device is connected to the computer.
- Device Permissions: Make sure you have permission to access the device.
- Driver Configuration: Make sure the driver is configured correctly.
Debugging
To debug the INDI server, use the verbose output options:
# Enable verbose output
indiserver -v indi_simulator_ccd

# Enable more verbose output
indiserver -vv indi_simulator_ccd

# Enable very verbose output (including all XML traffic)
indiserver -vvv indi_simulator_ccd
You can also enable debugging for specific drivers:
# Enable debugging for a specific driver
indiserver -d indi_simulator_ccd
Resources
Documentation
- INDI Library Documentation
- INDI Protocol Specification
- INDI Driver Development
- INDI Client Development
- INDI Developer Manual
Community
Tutorials
- INDI Tutorial: Getting Started
- INDI Tutorial: Using INDI Control Panel
- INDI Tutorial: Using KStars/Ekos
- Development Tutorials
Contributing to INDI
INDI is an open-source project, and contributions are welcome. Here’s how you can contribute:
Code Style
INDI uses Artistic Style to format all the C++ source files. Please make sure to apply the following astyle rules to any code that is submitted to INDI. On Linux, you can create ~/.astylerc file containing the following rules:
--style=allman
--align-reference=name
--indent-switches
--indent-modifiers
--indent-classes
--pad-oper
--indent-col1-comments
--lineend=linux
--max-code-length=124
Some IDEs (e.g. QtCreator) support automatic formatting for the code everytime you save the file to disk.
How to create Github pull request (PR)
How to contribute to INDI full guide
Here is the short version on how to submit a PR:
- Login with a Github account and fork the official INDI repository.
- Clone the official INDI repository and add the forked INDI repository as a remote (git remote add …).
- Create a local Git branch (git checkout -b my_branch).
- Work on the patch and commit the changes.
- If it is ready push this branch to your fork repo (git push -f my_fork my_branch:my_branch).
- Go to the official repo’s github website in a browser, it will popup a message to create a PR. Create it.
- Pushing updates to the PR: just update your branch (git push -f my_fork my_branch:my_branch).
If you would like to make cleaner PR (recommended!) please read this tutorial and follow it. The best way is to keep one logical change per commit and not pollute the history by multiple small fixes to the PR.
Unit Tests
INDI includes a unit test suite. To run the unit tests, you must first install the Google Test Framework. Then follow this build sequence:
mkdir -p build/indi
cd build/indi
cmake -DINDI_BUILD_UNITTESTS=ON -DCMAKE_BUILD_TYPE=Debug ../../
make
make test
Conclusion
INDI provides a powerful and flexible way to control astronomical equipment. By understanding the basics of INDI, how to install and set up the INDI system, and how to use INDI to control your astronomical devices, you can streamline your astronomical observations and focus on the science and beauty of the night sky.